Seed bright red potatoes of Rocco, Dutch selection, refers to hard varieties of medium ripening. It is characterized by high productivity, excellent preservation and what is perfect for cooking and baking. In this review, we will consider the characteristics of the variety and the technology of cultivation.
Characteristic and Description
Tubers differ in the following features:
- oval shape;
- dark red peel;
- creamy white flesh;
- the average size;
- solid consistency;
- flat eyes
- good taste.
 The variety is starchy, intended for the preparation of various dishes. The starch content is about 15%. Suitable for deep-frying and cooking chips. It tolerates winter storage. The keeping quality of the variety is 89%. The indicator is the higher, the more healthy the crop is laid in storage. The weight of the average tuber is 100–120 g. Productivity from 1 bush is about 1–2 kg. Per hectare - 350-400 c.
Did you know? The first to grow potatoes for food were Peruvian Indians in 8000–5000 BC e.
Botanical properties
The bush has semi-direct stems with alternating leaves. The stems grow throughout the growing season. The leaves are light green, medium in size with a moderate petiole. The shape of the leaves is ovoid, pointed at the end and obtuse on the side of the petiole. The edge of the sheet plate is slightly wavy. The frequency of flowers is low. The flowers are purple or pink. The tubers are oval, red in color with small eyes. The variety is resistant to nematodes, scab and various bacterioses. Therefore, its productivity is stable and almost independent of weather conditions.
Ripening time
Rocco is a mid-season variety. Harvest is expected for 100-150 days. The first number is the date of collection of root crops for immediate use. The second is the beginning of the collection for winter storage. If the weather is unfavorable, the ripening period of the crop is shifted by 1 week.
Taste qualities
The inner part of the tuber is with hard flesh of a neutral taste. When frying, the potato acquires a characteristic starchy sweet taste. Rocco can be used for any dishes: soups, main dishes, pastries.
Did you know? The first vegetable grown in low Earth orbit was potato. This happened in 1995 aboard the shuttle Columbia. Potatoes were grown as part of the NASA and Wisconsin University program to study the effects of direct cosmic radiation on plants.
Advantages and disadvantages
- Advantages of the Rocco variety:
- high resistance to diseases;
- resistance to weather conditions;
- good keeping quality;
- stable yield;
- uniform tubers;
- excellent taste.
- Disadvantages of Rocco:
- susceptible to leaf blight;
- medium resistance to scab and rhizoctonia.
Planting and growing
The Rocco variety needs fertile soil with a loose structure. To get a good crop, it is also necessary to provide plants with watering, fertilizer and pest protection.
Optimal landing time
Each region has its own “best days” for planting potatoes. They are due to long-term observations of plants and weather. In any case, it's spring. Potatoes tolerate cool weather well - from +7 to + 13 ° C. Therefore, landing can be carried out when the air temperature reaches these indicators. This will happen around the second week after the end of spring frost. If the vegetable is grown in containers, then the planting dates can be any. It is enough to count the planting date from the estimated date of harvesting such potatoes.
Preparing the site for sowing
Soil preparation is the key to a good harvest. The ideal time to prepare the site is in the fall.
So, the farmer has time to:
- remove weeds;
- to grow green fertilizers (rye, rapeseed), which loosen dense soil, extract nutrients from it and store them for spring planting of potatoes;
- destroy part of the pests that are in the soil.
Did you know? Due to the fact that they began to eat potatoes, the population of Europe grew by 25% from 1750 to 1900.
Rocco can grow on soils with any level of acidity. Therefore, deoxidation of the soil is not carried out. Fertilizing for the winter is also impractical, since they will have time to absorb and go into deeper layers of the soil, which will make them inaccessible to the root system of potatoes. Therefore, immediately after harvesting, deep loosening of the soil is carried out and cover crops (green fertilizers) are planted.
They manage to form a leaf part before frosts and the first snow. These plants are dug up before frost, they fall into the soil, forming a pantry with useful substances. The root system of rye or rapeseed loosens the soil, making it softer and more beneficial for the crop. Soil acidity should be in the range of pH 5.8–7. If this is not so, then introducing rotted manure for planting in spring will help to improve performance. After harvesting, the soil is dug up twice to improve aeration. This removes part of the weeds, and the roots of others are disturbed, which weakens weeds.
Preparing planting material
Prepare planting material in February. It is possible to germinate whole seed potatoes or cut them into pieces with several eyes. A part of potatoes with 4–5 eyes gives a larger crop than a whole with 1–2 eyes. If you cut tubers, then the prepared pieces should dry and slightly harden in the places of cuts. For disinfection, they are dipped in wood ash to prevent microbes from getting inside through the places of cuts. For this type of planting material, it is important that the soil is well warmed up and that there is no excess moisture.
Did you know? At the beginning of the 19th century in France, the Vitelotte noire variety of purple potatoes was developed. It has a dark gray peel and purple flesh.
In winter, potatoes are at rest. That he "woke up", it is necessary to germinate. Put the potatoes in a paper bag. So the potatoes will warm up, which initiates the germination of shoots. Germination allows you to accelerate the growing season and reduce the ripening time of the crop. 2-3 weeks are enough for this. Use moderate lighting and air temperature not higher than + 14 ° С. So on the planting material excellent chunky strong sprouts will be formed.
Landing technology
The technological process of planting consists of the following actions:
- A shovel is dug with a trench 30-40 cm deep. The shape of the trench is conical.
- A layer of loose soil (7 cm) is laid at the bottom.
- Potatoes with a distance between them of about 40 cm are laid on top of this layer.
- From above, tubers are covered with the same layer of organic fertilizers (rotted manure or compost) mixed with soil. Roughly this is 2-3 compost buckets per 1 m² of landing area.
- Urea or other nitrogenous fertilizers are added to this layer, according to the instructions on the package.
- Cover with a small layer of ordinary soil.
- 2 weeks after planting with a hoe, the first hilling is carried out and the planting is covered with mulch.
Video: planting potatoes
Potato care after planting
From the moment of emergence of sprouts it is necessary to maintain constant soil moisture. To make it easier - the bushes are covered with mulching material. It can be straw, sawdust, spruce branches, other materials. The mulch layer should be at least 5 cm. Mulching the soil will protect the bushes from the development of weeds. If the coating material is not used, then a day after irrigation, the soil is loosened to remove weeds. You can loosen the hoe or remove the weeds manually.
Did you know? Potato starch is used when drilling oil wells. It reduces fluid loss in the “drilling fluid”. This is the fluid that is pumped into the hole to clean and cool the drill bit.
Watering is carried out weekly. But the presence of mulch will prevent moisture loss. Therefore, you need to focus on the condition of the soil. If it has dried to a depth of 3-6 cm, then the time has come to water. When planting, Rocco contribute potassium and nitrogen, providing plants a quick start. If you introduced rotted manure, it is able to lower the acidity level of the soil from acid to neutral, as well as increase its nutritional value. Manure or compost can be mixed with bone meal, increasing the proportion of nitrogen. When applying inorganic fertilizers, it is correct to apply balanced formulations in which nitrogen, potassium and phosphorus are contained in equal proportions. It will take about 7 kg of fertilizer per 100 m² of area. You can add fertilizer to the soil every 2-3 weeks. If the bushes look great, then use a half dose of fertilizer for regular feeding.
Important! The green peel of a potato appears due to exposure to sunlight. At the same time, plant poison is formed in the tubers — solanine, green. It is toxic to both humans and animals.
Hilling is a process of periodically increasing earthen embankment over a potato bush. The recommended number of hills from 2 to 4 with an interval of 3 weeks, starting from the moment of germination of the stems to a height of 15 cm and ending with the end of flowering bushes. Under the influence of moisture and wind, the carried out hilling will settle. To prevent this, some farmers use additional constructions made of mesh or other material in order to prevent subsidence. But in any case, you need to make sure that the potatoes do not appear on the surface of the soil.
Diseases and Pests
Potatoes can bother many pests. Some of them damage the root system, others attack leaves and stems.
Important! Chemical reagents that process potatoes from pests are stored in plant tissues for up to 2 months. Keep this in mind if less time is left before the harvest.
The most common:
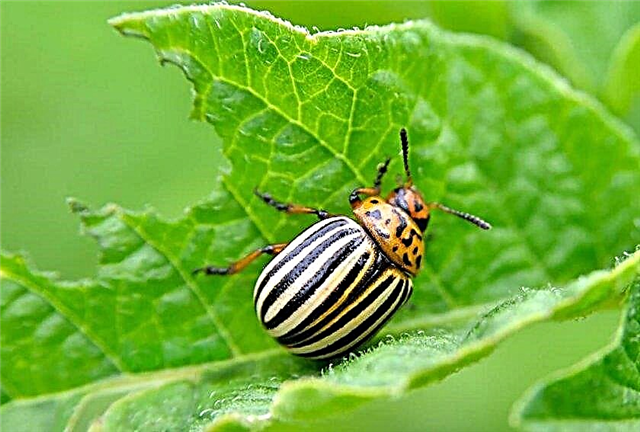
- Colorado beetle. You can find it in the form of orange eggs on the underside of leaves, red with black dots, larvae or beetles with a characteristic striped color. The beetle gnaws any parts of the plant. The manual collection of beetles and the destruction of its eggs is the most effective control measure. The use of traps with peeling potatoes with the subsequent destruction of trapped pests is also popular. Of the chemicals used "Fitoferm", "Aktaru", in accordance with the instructions on the package.
- Potato flea. A small bug of black color. It feeds on juice, affecting leaves and stems. Beetle larvae feed on roots. Activated in dry, hot weather. To combat the pest, it is necessary to adhere to crop rotation rules and conduct deep digging of the soil in the fall. Potatoes are sprayed from this pest with tobacco dust mixed with ash. From folk remedies, flea collection on a damp cloth is also practiced.

- Aphid. Tiny green sucking insects are a serious pest of garden crops. Aphids are dangerous not only because they damage the leaves, but also because on the sticky coating left after them, soot fungi begin to multiply, which leads to bacterial infection. The fight against aphids consists in processing crops with a soapy solution of insecticidal soap. Broad-spectrum insecticides are also used.

- Wireworm. The branching larvae of copper color are the larvae of the nutcracker. They infect potato tubers. Wireworms hit crops where potatoes are planted for a long time in the same place. To combat pest, plant mustard in the aisles. Her essential oils scare away these insects.

Potato diseases are related to weather conditions. Changes in humidity and temperature can become factors contributing to an increase in morbidity. Bacteria penetrate the root crops through the damaged areas of the tuber.
Important! If rot infects the roots, the plot becomes unsuitable for use under potatoes for at least 2 complete crop rotation cycles (6 years).
The most common diseases:
- Scab. The fungus that causes the disease can live in the soil for many years. But it is not active if its acidity is below 5.4 pH. Therefore, if signs of scab are detected, check the acidity of the soil. Signs are brown and hardened spots on tubers, covered with cracks. At first they are small, but as the disease progresses, the spots become larger. Sick up to 80% of the crop. As a measure to combat scab, the tubers are treated with Prestige a month before planting.

- Late blight. A fungal disease affecting young tubers in rainy and warm weather. It appears in the form of brown spots on root crops and leaves, which then dry out. Regular application of potassium and phosphorus fertilizers prevents the development of the disease.
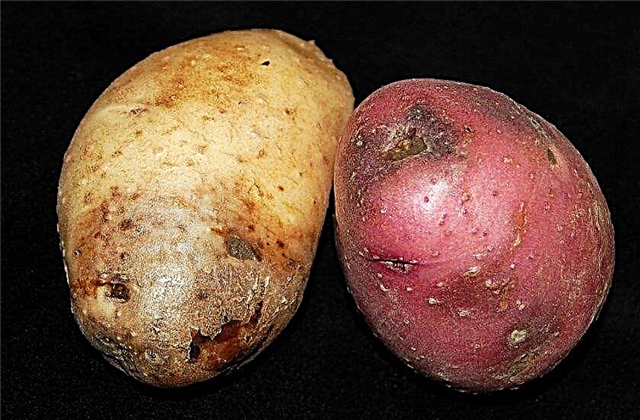
- Ring rot. It develops on tubers under the same conditions as late blight. It is transmitted with root crops infected with this fungus. Ring rot has a characteristic ring shape of brown spots. The main preventive measure is fertilizing with potassium and phosphorus fertilizers.

Basic preventive measures against diseases:
- crop rotation - you can’t plant potatoes for several years in a row on one site;
- treatment of seed with fungicides against rot and other diseases;
- destruction of tops and other places of wintering of pests;
- planting in plant aisles that will attract predator insects to control pests.
Harvesting and proper storage
Young potatoes are harvested for food on the 100th day after emergence. It is very simple to check whether it is worth digging potatoes: lift a bush with a shovel. If the tubers are large enough, then you can dig them for food. Ripe potatoes for winter storage are digged when the stems are dry. After that, wait another 2 weeks for the peel to get stronger and you can dig up the crop. The weather on the day of digging should be dry and sunny.
Try not to damage the tubers with a shovel. If the soil is moist, then when laying it for storage, it is worth drying the crop for several days in a dry room without direct sunlight. Store tubers in boxes. Indoors at a temperature not exceeding + 10 ° C, with a dry climate. Do not wash the potatoes before laying, this will shorten their shelf life.
Rocco variety - has wonderful characteristics. It can be grown in temperate climates. Planting care is the same as when growing other varieties of potatoes, and even if you have no experience in vegetable growing.


